LM35 Temperature Sensor
Introduction
Temperature measurement is a key element in a wide range of applications with electronics. Whether you need to control large-scale industrial processes or just want to check if your hamster’s cage is warm and cozy, temperature is your way to go. The most common sensor for this application is LM35, a cheap and easy to use sensor with ranges from -55 to 150°C, enough for most applications.
Parts
For this tutorial, you will need:
Linear Temperature Analog Sensor LM35
Breadboard & Jumper Wire Kit
Arduino Uno R3
Wiring
The LM35, like many sensors, has 3 pins, being one for +5V (red wire), one for GND (black wire) and one for the signal measured (yellow wire):
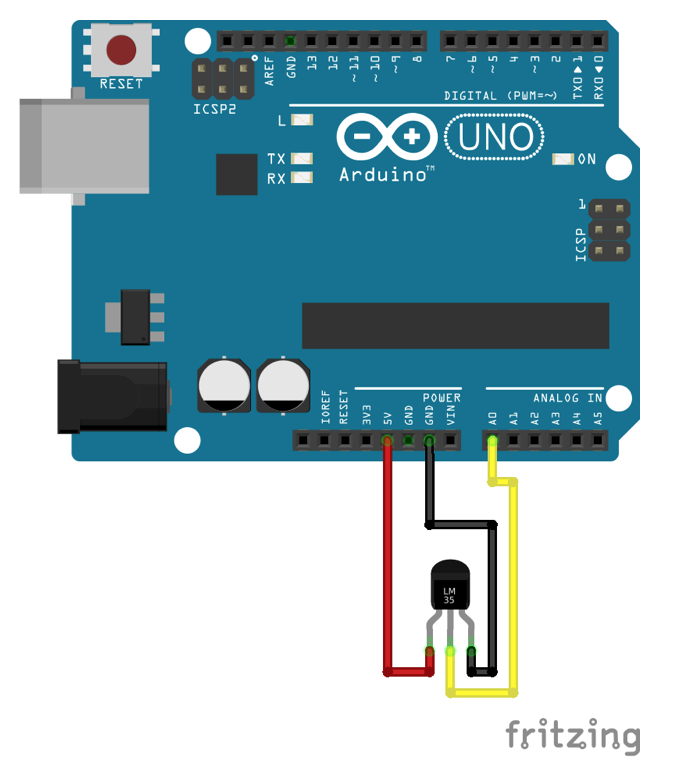
On this setup, the “signal” pin of LM35 must be attached on an analog input of Arduino UNO, which in this case could be one of the pins from A0 to A5.
Sample Code
Using the MakerVision app, you can get this setup running in a couple of minutes. Take a look at this sample and try to identify the functionality of each block:
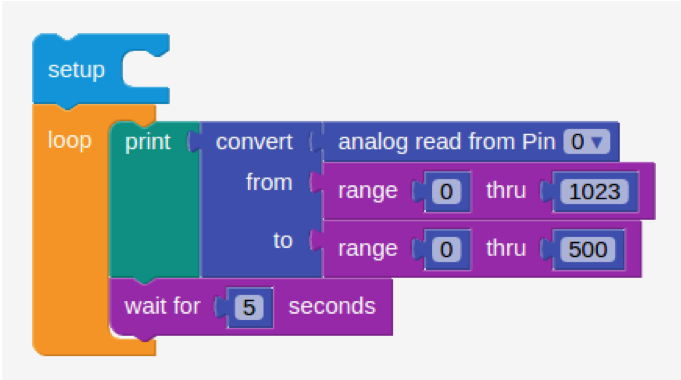
Seeing so many blocks tied together may sound complicated, so let’s take a close view in each step:
- The “signal” pin of LM35 is attached on the A0 pin of Arduino, so we need the block “analog read from Pin” set up at 0;
- The “convert” block makes the necessary calculations to transform the value acquired in the analog input to Celsius degrees;
- The result of the conversion will be printed on your screen;
- As temperature is a variable that usually changes slowly, you may want to wait a few seconds between measurements using the “wait” block in order to reduce the amount of data acquired to only what is relevant for you.
Digging deeper
Now that you successfully measured all the temperatures around you, let’s understand how this whole process works.
How does the LM35 work?
The LM35 series are precision integrated-circuit temperature devices with an output voltage linearly proportional to the Centigrade temperature, with the relation of 10mV/°C. This means that, if you have a temperature of 13°C, the LM35 will output a voltage of 130mV. This linearity of LM35 is what makes it one of the most easy-to-use temperature sensors, requiring no extra electronics circuit nor any complex math.
Converting analog data to digital values
When acquiring data from the analog input pins, the Arduino executes an analog-to-digital (A/D) conversion, transforming the input voltage in bits. The A/D converter of arduino UNO contains a 10-bit resolution, converting the voltage input of 0 to 5V in a range from 0 to 1023.
Understanding the math
Now that we understand the output voltage of the LM35 and how the Arduino reads this voltage, we can do the necessary math to output the correct temperature value on your screen. Using the “convert” block with the “analog read” block as input, we must set the correct maximum and minimum values. The input values are easy, as we already know that it’s range is from 0 to 1023. To the output values, we must just remember that the LM35 produces 0.01V/°C. As we know that the maximum range of 1023 corresponds to 5V, the maximum output range will be 5/0.01, resulting in 500.
Some small tips
- Read the LM35 datasheet! It can provide you lots of useful information, such as accuracy, power consumption, impedance and others.
- In case you prefer to display your results in Fahrenheit, you just need to adjust the output range in the “convert” block from 32 to 932.
- Search for other types of temperature sensors, like thermocouples and thermistors. Although they don’t seem as friendly as LM35, they can be pretty useful in many situations.