Scratch for Arduino with MakerVision
Introduction
This tutorial will show you how to begin using MakerVision to program Arduino boards, even if you have never programmed before. Here we will offer you guidance through each of the main blocks of MakerVision, so anytime you need help, just check them out.
Summary
- First step on MakerVision app
- Printing messages
- Variables
- Analog and digital I/O
- Math operations
- Conditionals: If and Else
- Loops: For and While
Parts
If you already have an Arduino, breadboard, jumper wires and a few sensors you can get started with what you already have. If you have nothing and you’re looking to get started, Amazon has some really nice starter kits that contain everything you’ll need.
I bought the Official Arduino Starter Kit and have had a lot of fun with it.
First step on MakerVision app
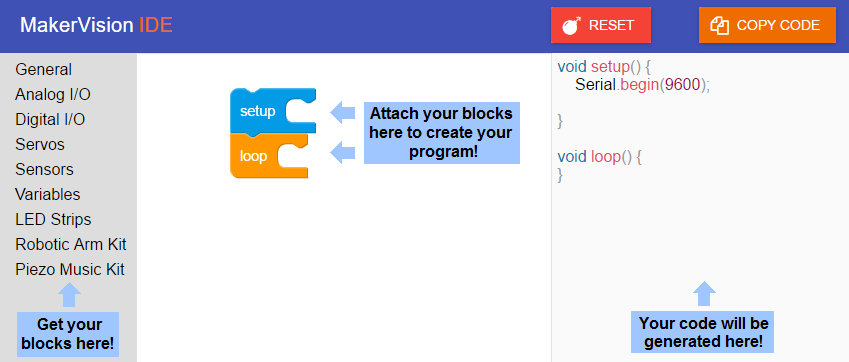
When you open the MakerVision app, you will have a side menu on the left, a blue setup block attached to an orange loop block and some code on the right side. The left-side menu contains the block library, where you gonna find blocks to attach on setup and loop to create your program. The right side is where your code will be automatically generated based on how you assemble the blocks.
Setup and Loop
Every arduino program contains the sections setup and loop, That’s why they already come in your workspace and can’t be deleted. The setup section must contain all the information that arduino needs to know before starting your program’s routine, such which ports are inputs and which are outputs. On the other hand, the loop section is where you will put all the tasks that Arduino must execute. When it finishes the last command, it will return to the beggining of loop and start all over again. In short: setup is where arduino sets up it’s stuff, and loop is where it execute these stuff in a loop. Makes sense, right?
Printing messages
Printing your information to the serial is one of the most important features when writing Arduino programs. It allows you to receive information from your Arduino while it executes your program, which can be seen on Arduino’s Serial Monitor. The print block can be found under the General tab of the side menu. Another important block to print your info is the one signed with quotation marks, where you can set text messages to be printed. Here is an example:
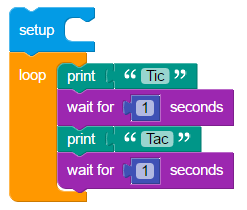
On this example, we set arduino to constantly send “tic-tac” messages each second. When you open Arduino’s Serial Monitor, this is what you should see:

If you want to print more valuable information than just tic-tacs, the Loops section has some nice examples!
Variables
Variables are used to store information which can be manipulated by your program. Under the side menu, you can find the Variables tab, containing 3 blocks.

As their names suggest, the create block will create a variable, and usually it is placed on the setup section, while the set number and get number blocks are used to read and write values of your variable. If you need more examples of how and why to use variables, keep reading!
Analog and digital I/O
On the Arduino world, the input and output (I/O) ports are your channel to communicate with the outside world. That is, whether you want to blink some leds, read sensor values or move a robotic arm, the I/O ports are your way to go! These ports are divided in two categories: Digital and Analog. The main diference of these two is, while digital I/O pins are binary (you only have two states: ON and OFF), the analog I/O allows you to assign values, giving you many possibilities.
Digital I/O
The Digital I/O tab gives you five blocks. The first one is used to configure the given pin as an input or output, and is usually placed at the setup section. The second block, turn pin, can be used to set your output pins to a high (on) or low (off) level. On the other hand, the block Digital read is used to read digital input pins, allowing you to know if the given pin is receiving a high or low level.
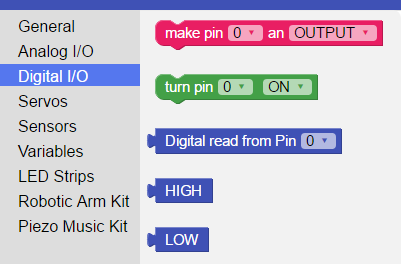
The last two blocks, HIGH and LOW, can be used as binary constants to help you perform some logical operations.
Analog I/O
The Analog I/O tab gives you two blocks: Analog write and Analog read.
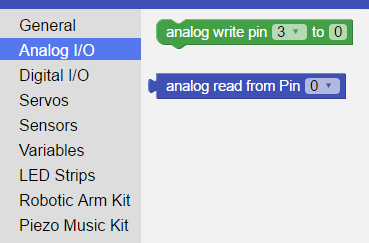
The Analog read block allows you to know the voltage that is being applied in the given analog port. On most Arduino boards, these ports have a 10-bit resolution, which means they can be signed to 2^10 different values, ranging from 0 to 1023. For example, if an analog input pin receives 3V (which is 60% of 5V), your program will receive a value of 60% in a scale from 0 to 1023, which gives you a value around 614. On the other hand, the Analog write allows you to output a voltage value ranging from 0 to 5V. These ports usually have a 8-bit resolution, so they can be signed to 2^8 values, ranging from 0 to 255. Following the same train of thought of the last example, if you want to produce an output of 3V, you will need to set your Analog write block to 60% of 255, giving you a value around 153. One important thing to note is that the analog output pins doesn’t deliver the constant voltage ranging from 0 to 5V. Instead, it produces a pulse width modulation wave (PWM), witch is a digital signal that sets it’s high level proportionally to the level implied, giving you the average of your desired voltage. For the given example, the PWM would stay 60% of it’s period turned on and 40% turned off:
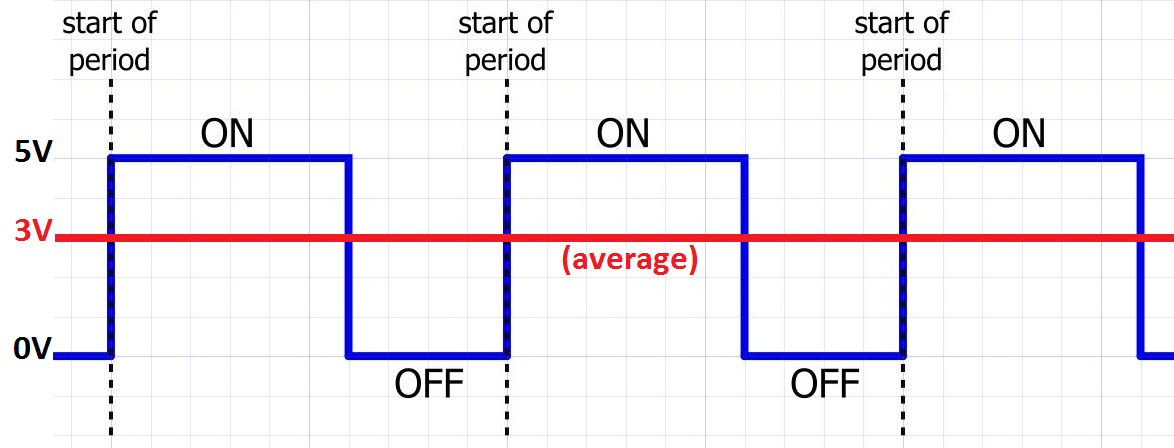
Despite it may sound a cheap trick for analog outputs, PWM works very well for most of situations, allowing you to set the brightness of your leds or control the speed of your motors with very good precision!
Math operations
Doing math operations on MakerVision is very easy. At the General tab you will find 3 blocks used for math operations. The first two are:
- The 0 block, where you can set constant values to use in your operations;
- The “_ + _” block, where you can perform your operations (click on the + to choose which operation you will perform);
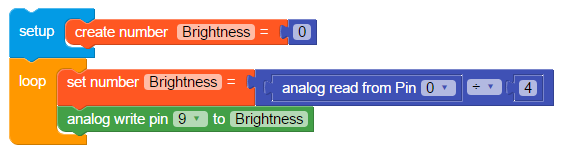
- The Convert block, used to convert scales. As an example, imagine that you have a potentiometer on A0 and you want to set the brightness of a LED on pin 9 proportional to the potentiometer. Then you would receive a value between 0 and 1023 and would have to transform it to a range from 0 to 255, which means you’re dividing by 4. Thus:
Another way to approach this problem is using the convert block, which allows you to do this operation straight-forward:

Both approaches will give you the same result. Although the division by 4 seems quicker, sometimes you will need to convert different scales that would require more operations (e.g. Fahrenheit to Celcius), so it’s up to you choosing which one you use on each situation.
Conditionals: If and Else
If you already know how to use conditionals, you can skip this section. Else, keep reading! Conditionals are the means your Arduino has to take decisions. It allows you to control all kinds of things. You can find the If block at the General tab. As an example, suppose you want to set an alarm to buzz (pin 9) when a button (pin 1) is pressed:
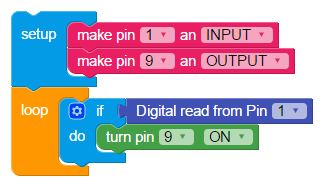
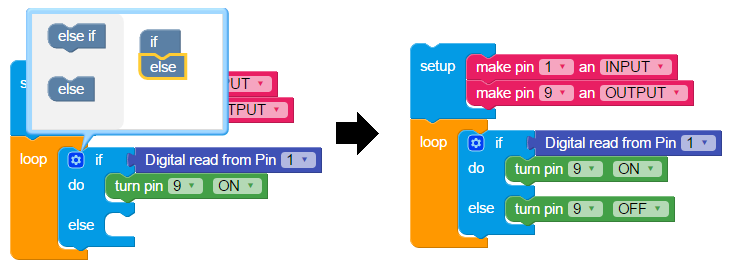
The blocks above are saying: If the button is pressed -> buzz! Quite simple, right? The main problem here is, after the button is released, the alarm will keep buzzing. You must have noticed a gear at the If block. It allows you to choose the conditionals If, Else and Else if, giving you the possibility to catenate many conditionals one to another. Now we can solve our problem correctly:
You can also use the If block with some logical operations. Check out these two blocks, also at the General tab:
- The block _ and _ gives you the possibility to combine two conditions at once on your if.
- The block _ = _ allows you to put conditions such as “greater than”, “less than” “equals” and others. This lets you work with your numeric variables, instead of only the binary ones.
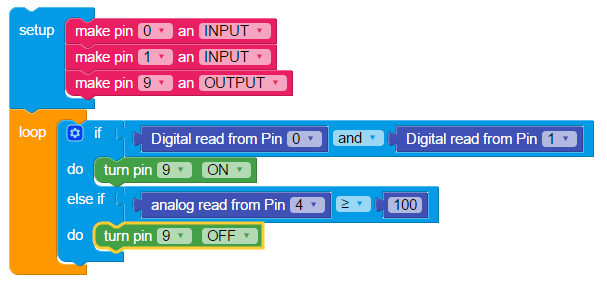
On the example above, the buzzer will be turned on if pin 0 and pin 1 are on level high. If Only one of these pins or none of them are on level high, the conditional else if goes into action, with the condition of “if the analog pin 5 reading is equal or greater than 100, then turn the buzzer off”. Try out different combinations of ifs, if elses and elses with the logical operators, they’re the key to solve most of your challenges when programming!
Loops: For and While
Some times you need a task to be executed for a certain amount of time, and sometimes you need to repeat a task until a certain condition is reached. This is where the for and while blocks go into action. Under the General tab, you will find these green blocks repeat _ times and repeat while. The first one will repeat for the amount of times you set on it, while the second will repeat while or until a certain condition is met. Check out the examples!
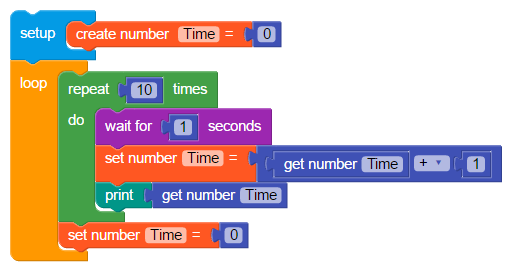
The example above shows you how to set a clock that waits for 1 second and shows the Time variable on Serial Monitor. This task will be repeated 10 times, and then restart. One other way to achieve the same result is setting a repeat while block with a condition “repeat while Time is less than 10”.
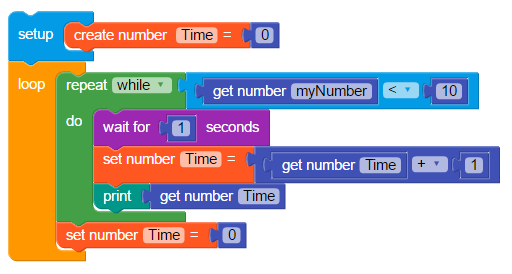
When the variable Time reaches 10, the program will skip the repeat while loop and go to the next command, which sets the Time to zero, allowing it to enter the repeat while loop again.